Those little gnats hovering around your houseplants are more than just annoying. They are often fungus gnats, but a few common lookalikes can fool you. The adults you see are only the tip of the problem. The main issue is in the potting mix, where larvae feed on fungi and decaying organic matter and can damage fine roots when populations are high, especially in seedlings, cuttings, and stressed plants.
The good news: you can get rid of them without tossing your plants. The trick is to hit adults, larvae, and eggs at the same time, and fix the moisture conditions that keep the cycle going.

First, confirm what they are
Not every small flying bug is a fungus gnat. Identification matters because the fix is different for fruit flies, drain flies, phorid flies, and thrips.
Common signs of fungus gnats
- Tiny black or gray flies that weakly flutter near the soil surface.
- They show up most when you water or disturb the top inch of potting mix.
- Larvae are small, translucent worms with dark heads, found in the top layer of moist soil.
- Plants may look stalled, yellowing, or droopy even though the pot is damp.
Quick test
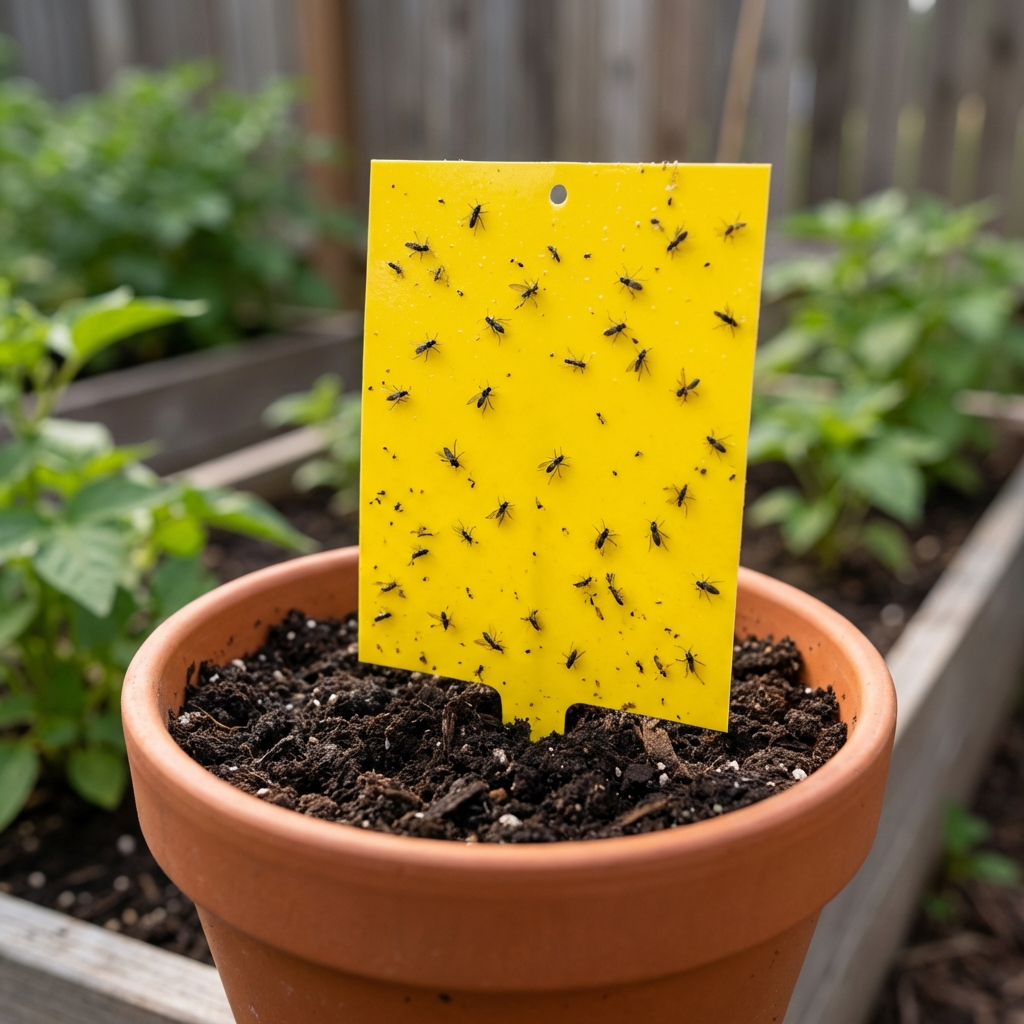
Place a yellow sticky trap right at soil level for 24 to 48 hours. If you catch multiple tiny flies and most activity is right around the pot, fungus gnats are very likely. Sticky traps are not perfectly definitive because they can catch other small flies, so use this quick check too:
- Fungus gnats mostly hang around pots and seem to emerge from the soil.
- Fruit flies hover around fruit bowls, recycling, and trash.
- Phorid flies tend to run on surfaces and fly in short, jerky bursts.
Once you have confirmed fungus gnats, tackle them at every life stage so the problem does not reset every few days.
Why gnats keep coming back
Fungus gnats thrive in what most indoor plants accidentally get: consistently moist potting mix, organic material to feed on, and a warm indoor environment. They also commonly arrive in your home on new plants or in potting soil that was stored open or already infested.
- Overwatering or watering too often, even if you use small amounts.
- Poor drainage (no drainage hole, compacted mix, pot sitting in water).
- Old potting mix breaking down into fine particles that hold water.
- Top dressings like moss or thick organic mulch that stay wet.
- Algae or mold on the soil surface from low light, low airflow, and constant moisture.
If you only swat the adults, you will feel like they are “coming out of nowhere.” They are not. They are emerging from the pot on a schedule.
Fast plan for 7 to 14 days
Here is the approach I recommend because it is reliable in real homes. You will:
- Dry the top layer so eggs and larvae struggle.
- Trap adults so they cannot lay more eggs.
- Treat the soil to kill larvae already in the pot.
Step 1: Fix watering first
Let the top 1 to 2 inches of potting mix dry before watering again. For many houseplants, that means watering less often than you think.
- Water slowly until it drains, then empty the saucer.
- Make sure the pot has a drainage hole. If it does not, consider repotting.
- If the mix stays wet for days, you likely need a lighter, airier soil (more perlite, bark, or pumice depending on the plant).
Note: Some moisture-loving plants (like many ferns) should not be allowed to dry as much. In those cases, lean harder on larval treatments (BTI or nematodes), improve drainage and airflow, and avoid keeping the surface constantly soggy.
Tip: Bottom watering can help some plants, but if you bottom water constantly, the mix can stay too wet. Use it strategically, not as a daily habit.
Step 2: Put sticky traps at soil level
Sticky traps do not solve the whole problem, but they are excellent for knocking down adults and tracking progress.
- Use yellow sticky traps and place them right above the soil, not up in the leaves.
- Replace when covered in dust or bugs.
- Keep traps up for at least 2 weeks because new adults can emerge after you start treatment.
Safety: Place traps where pets and small children cannot reach them. The adhesive is messy.
Step 3: Kill larvae in the soil
Larvae are the stage you must eliminate. Pick the method that fits your comfort level and what you have available.
Option A: BTI (mosquito bits or dunks)
BTI (Bacillus thuringiensis israelensis) is a targeted biological control that kills fungus gnat larvae when they feed. It is widely used and is one of the most plant-friendly options.
- Common method: soak mosquito bits in water to make a “tea,” then strain and use it to drench the soil.
- Follow the label for soak time and dosing since products vary.
- Repeat on a schedule that matches the label, commonly weekly for 2 to 4 applications.
This timing matters because eggs can hatch after your first treatment.
Option B: Beneficial nematodes (Steinernema feltiae)
Beneficial nematodes are microscopic predators that hunt gnat larvae in the soil. This option is great if you have a lot of plants or repeated outbreaks.
- Use fresh product and store it properly (usually refrigerated) until application.
- Apply to moist soil (not bone dry).
- Keep soil slightly damp for a few days so they can move through the mix.
- Follow package rates carefully.
Option C: Hydrogen peroxide drench (optional, use carefully)
A diluted hydrogen peroxide drench can reduce larvae quickly, but it is not my first choice for sensitive plants, fragile roots, or long-term control. It can also disrupt beneficial soil microbes.
- Common mix: 1 part 3% hydrogen peroxide to 4 parts water.
- Pour through the soil once, allow it to fizz, then let the pot drain fully.
- Do not repeat frequently.
- Handle peroxide carefully and keep it away from kids and pets.

If gnats are stubborn
If you are still seeing gnats after a week, do not panic. It usually means the soil stayed wet, you have multiple pots acting as breeding sites, or adults are coming from another nearby source.
Top-dress to block egg laying
After the soil surface dries, add a physical barrier that dries fast. This can help, especially when paired with a larval treatment.
- Coarse sand (a thin layer, not fine play sand packed tight).
- Fine pumice or horticultural grit.
- Diatomaceous earth (works best when dry, loses effectiveness when wet).
A barrier helps, but it will not kill larvae already deeper in the pot. It can also fail if the surface stays damp or adults are coming from another pot. Pair it with BTI or nematodes for best results.
Repot if the mix is swampy
Sometimes the potting mix is the real issue. If water sits for days, the soil smells sour, or the mix is breaking down into mush, repotting is the reset button.
- Use fresh, well-draining mix suited to the plant.
- Rinse the pot before reusing it.
- Gently shake off loose, wet soil around the root ball.
Check hidden breeding spots
- Drip trays that always have water.
- Cachepots where water collects at the bottom.
- Propagation jars with algae and decaying stems.
- Overly moist seed starting trays nearby.
- Open bags of potting soil stored in warm areas.
Quick thrips note
If you also see tiny insects on leaves, silvery scarring, or stippling, do not assume gnats. That can point to thrips, which need a different plan.
What not to do
- Do not keep the soil constantly wet “to help the plant recover.” That fuels gnats.
- Do not rely on vinegar traps as the main solution. They catch some flyers but do nothing to larvae in pots.
- Do not pour boiling water into pots. It can kill roots quickly.
- Do not spray random bug sprays indoors. Many are ineffective on larvae and risky around pets and kids.
Prevention
Once you break the life cycle, prevention is mostly about moisture management and new-plant hygiene.
Simple habits that work
- Let the top inch of soil dry between waterings for most common houseplants.
- Use pots with drainage and empty saucers after watering.
- Choose a potting mix that does not compact. Add perlite or pumice if needed.
- Improve airflow and avoid letting algae or mold build up on the soil surface.
- Quarantine new plants for 1 to 2 weeks and use a sticky trap to monitor.
- Store potting soil sealed and dry. Open bags can become a gnat nursery.
FAQ
Are fungus gnats harmful to plants?
Adult gnats are mostly a nuisance. The larvae mostly feed on fungi and decaying material, but they can also chew fine roots when infestations are heavy. Damage is most noticeable in seedlings, cuttings, and already-stressed plants.
How long does it take to get rid of gnats?
If you dry the soil properly and treat larvae, you can often see a big drop in 3 to 7 days. Full control commonly takes 2 to 4 weeks in stubborn cases, depending on moisture, temperature, and how many pots are involved.
Do cinnamon, coffee grounds, or essential oils work?
They are unreliable. Some may slightly deter adults, but they do not consistently eliminate larvae. Coffee grounds and other organic amendments can also hold moisture and feed the problem.
What is the most trusted treatment?
For most home growers: improved watering plus BTI (mosquito bits) and sticky traps is the most dependable, low-drama combo.
My quick recommendation
If you want the simplest plan that works for most households, do this:
- Let the top 1 to 2 inches of soil dry between waterings (adjust for moisture-loving plants).
- Put yellow sticky traps at soil level.
- Drench with BTI water on the schedule on your product label, commonly once a week for 2 to 4 weeks.
That combo breaks the cycle, and it does not require harsh chemicals or perfect conditions.

Jose Brito
I’m Jose Britto, the writer behind Green Beans N More. I share practical, down-to-earth gardening advice for home growers—whether you’re starting your first raised bed, troubleshooting pests, improving soil, or figuring out what to plant next. My focus is simple: clear tips you can actually use, realistic expectations, and methods that work in real backyards (not just in perfect conditions). If you like straightforward guidance and learning as you go, you’re in the right place.